In the Behind the Scenes series, I'm inviting artists to talk about the creation of one of their works. Today, Juho Röyhy talks about 'Retro Blaster'.
Hey everyone, my name is Juho Röyhy, I’am also known by the nickname jjjuho. I have been using Blender for 2 years actively now. Started with 3dsmax and after half a year transferred over to Blender and theres no going back. Blender is awesome.
Anyway, I’am glad to present you one of my latest projects here at Blender Nation. I’l go through the creation process and try to give some insight on how I achieved the final result.
Pin your interest
This project started just like many other of my freetime projects, I was just browsing images through Pinterest. If you haven't heard about Pinterest, you should really check it out. Its a great tool for gathering references and inspirational imagery. I use it by daily basis to get some fresh ideas and to explore different kind of art-styles and approaches to creating things.
Anyway while browsing images there I found few inspiring scifi weapon pieces, which then sparked something inside me to design one myself.
As I do with most of my projects I first researched a bit what other people had done when it comes to scifi weapons. Made a list of things I liked about their designs.
Sketching it out
I started with only primitives to get a silhouette I like, obviously using mirror modifier make things a bit faster. Before starting blocking shapes I already had an idea of the design language I was going to pursue: Fallout’ish retro future style. After I had achieved a silhouette I like, I started fleshing out a bit more defined shapes from the primitives created before.
Start is always the hardest part for me: Clean plate scares the shit out of me. However at this point I am already feeling pretty confident that my design will work and therefore relaxing honing and detailing process can start.
A bit by bit
I start by adding subsurf modifiers on top of all parts, adding needed controller loops and by defining already created shapes further to my liking. A bit by bit I layer more geometry and details such as grip tapes, wires, screw placeholders, some guiding shapes and crosshair.
For wires I used curves with bevel, its fastest way to generate curved tube geometry. The wire-look effect itself comes from procedural normal map, as the geometry itself is pretty low-poly. For the grip taping I just extruded one plane with ctrl + m1 over and over the handle, after it was fully covered I used shrinkwrap to make it fit properly and solidify to add volume. Process of creating the grip taping was surprisingly fast: Took like 10-15 minutes.
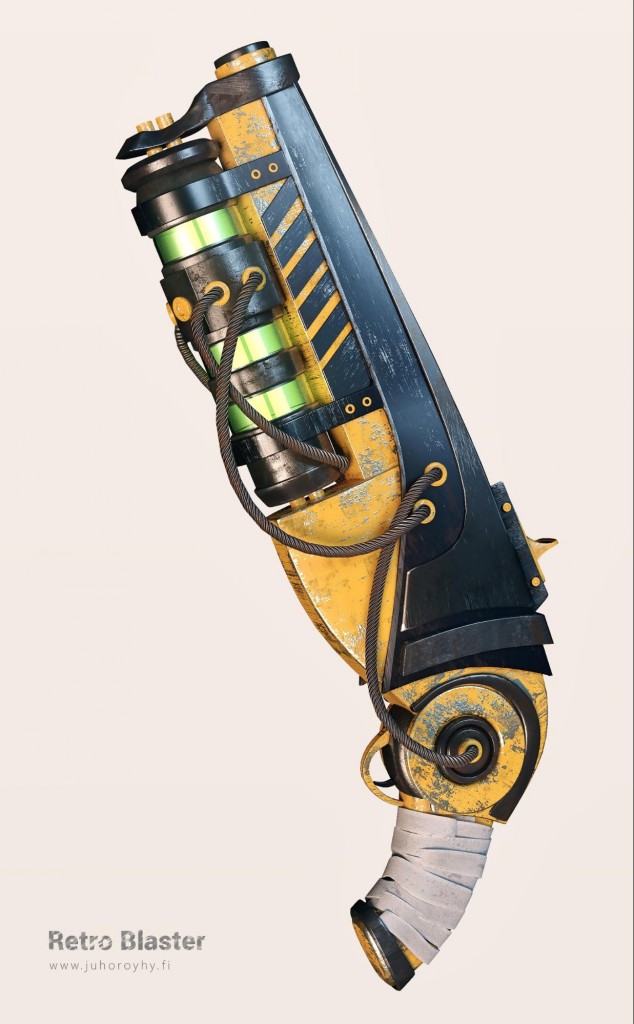
When adding details I try to always think that every detail should tell a story about a gun, have a some sort of function. Some ideas of my design were that gun works by some sort of energy cells or such, so cables get the stuff from lower part of gun to pipe. Another idea was the handle that can be rotated inwards for better mobility: theres a hinge in that cylinder close to handle and trigger.
At this stage I have already nailed the most of the design and added basic procedural texturing along some fast uvs to start testing out which kind of materials could work. Personally I thought that it looked too boring, it needed some more color and something interesting to pop it out more.
Getting feedback and making it work
This is also the stage that I shared my WIP with some other CG-artists to get some feedback and how to improve it further. I took the critiques to consideration and changed the things I agreed upon. Decided that as it works by plasma cells or such it might be a good idea to switch the metallic lower part to more transparent and glowing ammo holder, which would generally look more intresting. Another thing I didnt like was the colors, wanted something more popping and radical. Played around with different colors, but after all yellow and black seemed to be the best to go on with that slimy green in ammo holder.
The last thing left was defining materials and adding scratches and dirt to edges, crevices and the hull itself in order to give weapon more worn feel. I achieved this by mixing few image textures, using few color ramps and by using dirty vertex color to add extra worn effect to edges of the shapes.
Almost there!
After shaders are completed all that's left is pretty much rendering and final composition in photoshop. I rendered ambient occlusion and combined passes. Felt like it was enough. I used ambient occlusion pass with alpha mask to highlight some details and make reading of the overall shape easier to viewer.
I also added a bit of glow to green ammo holder part of the gun and corrected colors and values with color balance and curves tools. Those are really the two wonder tools that should be used by every artist in every compositio process they do. Those tools make wonders to image with just few seconds spend. Last, but not least I added some smart sharpen to give render a bit more crisp feeling to it
The final result.
That's pretty much all of it. I really tried to open my thought process, think I succeeded quite well when it comes to that. I’am sorry if there, wasnt enought technical notes, but I find that people using Blender usually stuck too much on technical side of things instead of focusing on design and the creation process itself. However if theres anything you’d like to ask, feel free to do so.
I’l do my best trying to answer :)


1 Comment
This is very nice work! Think of making tutorial on this subject! thanks for sharing!